I’ve seen designs for very good compost bins in books and magazines, but they will:
|
cost us a hundred bucks or more for material | |
|
take a full day or more in construction time | |
|
not work much better than our simple, cheap "system" |
We can also buy completely built composters. The best one might be at compostumbler.com, but it's about $400 and, like everything else, will eventually need fixing.
What we'll build will cost only about $30, need just an hour in construction time, and in the unlikely event repairs become necessary, can be done for pocket change.
Here's how we build it:
1. Pound the six poles into the ground in the shape of two adjacent squares. I hope we can see the two poles in the middle are used by both squares. It will look something like :::
2.
Each side of the square should be about 3 to 3 1/2 feet, or one meter. (It’s a little known
fact, finally now disclosed, but the entire metric system was based on the dimensions of compost
bins in 18th century Paris gardens.) ![]()
If our
compost bins aren't large enough, they'll fill up too quickly. If the bins are too large,
they'll fill too slowly and won't be able to support the heat of
decomposition.
Yes, heat is developed during decomposition, up to 150 degrees when everything is cooking just right. This heat is caused by bacteria breaking down organic matter, and helps to purify our compost of pathogens.
One of the ways
we know our compost is working is to
put our hand on the soil (or in it) after the sun has gone down, and feel the warmth.
3. Tightly wrap the chicken wire around the left side, the back and the right side. One long piece is best. Then we put a length of chicken wire between the two center posts. Tie the chicken wire to the posts with plastic tie straps or steel wire. Cut off all excess lengths. It should look like a giant E with the openings facing us.
4.
I've sometimes run a length of chicken wire about 18" high across the front of
the bins. It keeps compost from falling out the front, and
One
too-clever compost bin design has the fronts made of wood slats, about 1” x
8” x 36". The slats slide into posts grooved to take them, later added edge-to-edge, higher and higher as the pile
grows. The photo shows a ready-made bin.
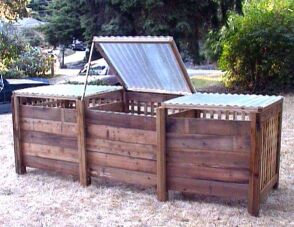 The
company's 2-bin model is
about $375 plus shipping. I came up with this idea independently (I think) and built
one in the 1980s from lumber bought at the store.
The
company's 2-bin model is
about $375 plus shipping. I came up with this idea independently (I think) and built
one in the 1980s from lumber bought at the store.
Seems it should work great, but it was using it to discover a flaw not considered in the design stage: the posts can be neither too far nor too near apart, or the slats will fall out or won’t fit.
Much too hard.
Just use simple metal posts,
make the sides with chicken wire,
and be done with it.
next: Starting our compost